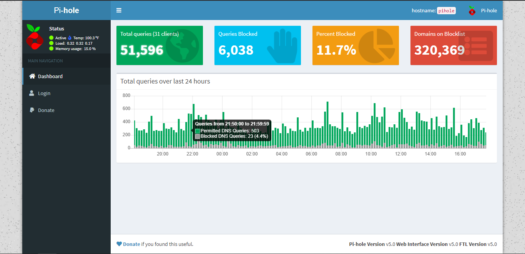

Pi-hole is a small DNS server that blocks known advertising domains from loading on webpages. It has become one of my most favorite projects, and it is very simple to deploy using a Raspberry Pi. I love it so much that I created a Pi-Hole instance using the free tier virtual machine on Google Cloud Platform. I’ll discuss how I did this in a future post.
To get started with this project, you’ll need a Raspberry Pi. A Raspberry Pi Zero will do just fine, but you can also do this with a Pi2 or Pi3. You’ll also need an SD card for the Raspberry Pi.
Step 1 – Downloading and Installing Raspbian
At the time of this writing, Raspbian Buster is the current version. Download the Raspbian Lite version appropriate for your Pi.
Once you have this image downloaded, you’ll also need a tool to write the image to your SD card. I recommend Etcher. Insert your SD card into your computer, select the image with Etcher and write!
Once you have the image written to your SD card, place the card in your Pi and boot it up. When you get to a login prompt, you are all set.
Step 2 – Installing Pi-Hole
The next step is configuring network access and installing Pi-Hole on your Pi. I recommend using a wired connection, but Wi-Fi will work with less reliability.
The first step is to log into the Raspberry Pi using a keyboard and monitor (or television) connected directly to the Pi.
The default username for a fresh install is the following:
- Username: pi
- Password: raspberry
If you want to configure Wi-Fi, read the Documentation on how to configure it.
Use the following command to install Pi-Hole:curl -sSL https://install.pi-hole.net | bash
Run through the installer and configure your desired options. You’ll want to pay close attention to the option to make the IP address static. Also note the admin password assigned to your Pi-Hole after setup completes.
- You can change the password by issuing the command:
pihole -a -p
Step 3 – Configuring your Router
You’ll need to change your router’s configuration to use Pi-Hole as it’s DNS server. This setup is dependent on your router, but basically you have two options:
- Configure Pi-Hole as the DNS for your LAN (Documentation)
- Disable the DHCP server on your router, and enable the DHCP server on Pi-Hole. (Documentation)
Step 4 – Enjoy Ad-Free browsing!
That’s it! You’ve configured Pi-Hole as your own personal blackhole for internet advertising. Sit back and enjoy!